

How To Draw A Table In Latex
LaTeX, pronounced as Lay-Tek or Lah-tek, is a documentation language for creating professional documents. Its most common use is technical and scientific documentation considering information technology provides a What Y'all Run across Is What You Hateful approach. This method allows y'all to focus only on the contents of your certificate without worrying about the formatting.
This tutorial aims to teach you how to utilize LaTeX to create various table types and populate them with data.
NOTE: This tutorial assumes you are not new to LaTeX; information technology does not serve every bit an introduction to LaTeX.
How to Create a Simple Table With LaTeX
Tables are standard when working with scientific documents. LaTeX offers an extensive collection of tools you can use to create and customize various table elements.
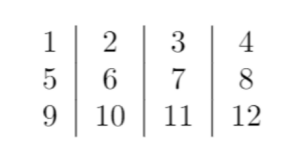
To create a unproblematic table in LaTeX, use the tabular environment.
To separate columns, use the ampersand symbol &. To separate rows, apply the new line symbol \
The post-obit LaTeX code creates a simple tabular array.
\documentclass{article}
\usepackage[utf8]{inputenc}
\title{LinuxHint - LaTeX tables}
\writer{LinuxHint}
\engagement{June 2022}
\begin{certificate}
\begin{center}
\begin{tabular}{c|c|c|c}
one & 2 & 3 & iv \\
5 & six & 7 & 8 \\
9 & 10 & 11 & 12 \\
\cease{tabular}
\end{middle}
\maketitle
\end{certificate}
Use the tabular surroundings to tell the LaTeX compiler that you wish to create a table.
Inside the tabular environment, you must specify the parameters defining the number of columns to insert. For instance, 4 (c) values indicate four centered columns.
In one case you lot compile the code below, you should get an output as:
How to Add A Horizontal Line
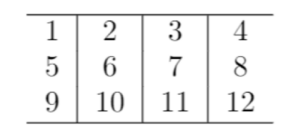
You lot tin use the \hline command to add together a horizontal line at the top and bottom of the table.
The code for that is:
\documentclass{article}
\usepackage[utf8]{inputenc}
\championship{LinuxHint - LaTeX tables}
\author{LinuxHint}
\engagement{June 2022}
\brainstorm{document}
\begin{centre}
\begin{tabular}{c|c|c|c}
\hline
1 & ii & 3 & 4 \\
5 & 6 & 7 & 8 \\
9 & x & eleven & 12 \\
\hline
\end{tabular}
\cease{center}
\maketitle
\end{document}
One time you compile the code, yous should get a table with a horizontal line at the top and bottom as:
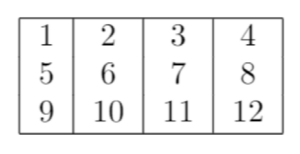
To create an enclosed tabular array with vertical lines on both sides, you can specify ii pipes at the beginning of the column definition as:
\brainstorm{tabular}{ | c | c | c | c | }
A total example lawmaking for this is:
\documentclass{commodity}
\usepackage[utf8]{inputenc}
\championship{LinuxHint - LaTeX tables}
\author{LinuxHint}
\engagement{June 2022}
\begin{document}
\brainstorm{eye}
\brainstorm{tabular}{ | c|c|c|c | }
\hline
one & 2 & three & 4 \\
5 & 6 & 7 & 8 \\
9 & x & xi & 12 \\
\hline
\end{tabular}
\end{center}
\maketitle
\cease{document}
Once you compile the code above, y'all should become an output similar to the one shown beneath:
How to Align Column Text
LaTeX allows u.s.a. to let column text to the right, left, and center. Past default, LaTeX uses {c} to align the text center.
To fix the text to correct or left, use {r} and {l} respectively.
For example, the following blocks show how to create tables with the right text-align.
\documentclass{article}
\usepackage[utf8]{inputenc}
\title{LinuxHint - LaTeX tables}
\author{LinuxHint}
\engagement{June 2022}
\brainstorm{document}
\begin{center}
\brainstorm{tabular}{ | r|r|r|r | }
\hline
i & 2 & three & 4 \\
5 & half dozen & seven & 8 \\
nine & 10 & xi & 12 \\
\hline
\terminate{tabular}
\end{center}
\maketitle
\end{document}
How to Create a Multi-Page Table With LaTeX
To create a tabular array that takes up 2 or more pages, you need to utilise the longtable package. To practise this, enter: the line
Specifying the longtable packet allows the tables to be cleaved downwardly and combined using LaTeX folio break tools.
To create a long table, yous need to add together iv commands.
- \endfirsthead – The content that precedes this control is allocated at the get-go of the table on the first page.
- \endhead – The content between this command and endfirsthead is allocated at the top of the table on every page except the first one.
- \endfoot – The content is allocated at the bottom of every folio except the last one.
- \endlastfoot – Displayed at the bottom on the last folio where the tabular array ends.
The following creates a simple multi-page table.
\documentclass{article}
\usepackage[utf8]{inputenc}
\usepackage{longtable}
\begin{document}
\begin{longtable} [c] { | c | c | }
\label{long} \\
\hline
\multicolumn{2}{ | c | }{ Start Tabular array} \\
\hline
Hello & World \\
\hline
\endfirsthead
\hline
\multicolumn{2}{ | c | }{Continue tabular array to pages} \\
\hline
Hello & Globe \\
\endfirsthead
\hline
\multicolumn{2}{ | c | }{Start Another Table}\ref{long}\\
\hline
\endhead
\hline
\endfoot
\hline
\multicolumn{2}{ | c | }{This Ends the Tabular array} \\
\hline
\endlastfoot
[REPEAT multi-column]
\stop{longtable}
\end{document}
How to Combine Rows and Columns In LaTeX
You tin can utilise the control \multirow and \ multi-column to combine rows and columns.
Multi-columns
The general syntax to combine multiple columns is:
\multicolumn{Number_of_columns}{align}{content}
For example, consider the code below:
\documentclass{article}
\usepackage[utf8]{inputenc}
\brainstorm{certificate}
\begin{tabular}{ | p {5cm} | p {3cm} | p {3cm} | p {3cm} |}
\hline
\multicolumn{iv}{ | c | }{Trek List} \\
\hline
Name & Release Date & Director & Story By \\
\hline
Star Trek: The Motion Picture & December 7, 1979, & Robert Wise & Alan Dean Foster \\
Star Trek 2: The Wrath of Khan & June 4, 1982, & Nicholas Meyer & Harve Bennett \\
Star Trek Five: The Final Frontier & June 9, 1989, & William Shatner & William Shatner \\
\hline
\end{tabular}
% Data Source -> "https://en.wikipedia.org/wiki/List_of_Star_Trek_films
\end{document}
Note: It is skillful to ensure the columns are spaced evenly by specifying the dimensions.
In the the command \multicolumn{4}{ | c | }{Expedition Listing}
The {iv} defines the number of columns to combine.
The adjacent part {|c|} defines the delimiters and the alignments for the columns.
{Trek Listing } – The proper noun for the combined columns.
Once you compile the LaTeX lawmaking to a higher place, you should get an output equally:

Multi-Rows
To combine rows using the multirow command, you need to import the multirow package.
The post-obit example code shows how to combine rows.
\documentclass{article}
\usepackage[utf8]{inputenc}
\usepackage{multirow}
\begin{document}
\begin{heart}
\begin{tabular}{ |c|c|c|c| }
\hline
Column1 & Column2 & Column3 & Column4 \\
\hline
\multirow{3}{6cm}{Combined rows (cells)} & cell1 & cell2 \\
& cell3 & cell4 \\
& cell5 & cell6 \\
\hline
\end{tabular}
\end{centre}
\end{document}
Examining the command: \multirow{3}{6cm}{Combined rows (cells)} & cell1 & cell2
You volition go 3 parameters:
The first one is the number of rows to combine. And so in this example, three rows.
Next, the 2d parameter defines the width of the column. In this example, 6cm.
Finally, the last parameter defines the content inside the cell.
Compiling the code higher up should give a table like to

About Tabular array Captions, Label, and References
You can create tabular array captions and labels, which you can use to display information near the table or reference information technology.
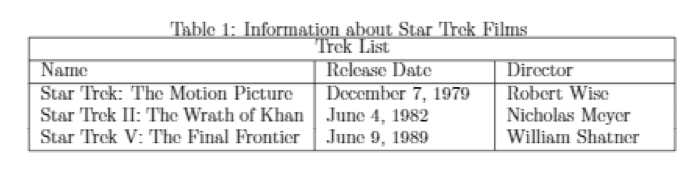
To add a caption to a table, employ the \caption control. You can place the table caption below or higher up the tabular array.
For example:
\documentclass{article}
\usepackage[utf8]{inputenc}
\brainstorm{document}
\brainstorm{table}[h!]
\centering
\caption{Information most Star Expedition Films}
\begin{tabular}{ | p {5cm} | p {3cm} | p {3cm} | p {3cm} |}
\hline
\multicolumn{3}{ | c | }{Expedition List} \\
\hline
Name & Release Date & Director \\
\hline
Star Trek: The Move Picture & December vii, 1979, & Robert Wise\\
Star Trek II: The Wrath of Khan & June 4, 1982, & Nicholas Meyer\\
Star Trek 5: The Final Frontier & June 9, 1989, & William Shatner\\
\hline
\end{tabular}
\label{treks}
\end{tabular array}
% Data Source -> "https://en.wikipedia.org/wiki/List_of_Star_Trek_films
\end{document}
Once y'all compile the code, you should get a tabular array with a caption at the top, as shown in the epitome beneath:
Conclusion
This tutorial has discussed the basics of creating and working with Tables in LaTeX.
Every bit you know, LaTeX is a powerful tool, and this tutorial does not scratch the surface of how to work with LaTex tables.
The LaTex documentation is a great reference guide. Please refer to it as needed.
About the author
![]()
My proper noun is John and am a beau geek similar you. I am passionate most all things computers from Hardware, Operating systems to Programming. My dream is to share my knowledge with the world and help out fellow geeks. Follow my content by subscribing to LinuxHint mailing list

Source: https://linuxhint.com/create-tables-latex/
Posted by: morriswitts1986.blogspot.com
0 Response to "How To Draw A Table In Latex"
Post a Comment